Java Mail Attachment Converted To DAT
Java mail 1.6.2
About Software Development
Java mail 1.6.2
Spring Boot 2.x.
One of the most popular forms of cloud computing is software-as-a-service, SaaS(/sæs/) for short.
I am using Apache Shiro to do authentication and authorization.
In mysql, there is a timestamp field whose value is 2019-06-20 17:24:00.
mysql 5.7
HTTP compression is a capability that can be built into web servers and web clients to improve transfer speed and bandwidth utilization.
HTTP data is compressed before it is sent from the server: compliant browsers will announce what methods are supported to the server before downloading the correct format; browsers that do not support compliant compression method will download uncompressed data.
The most common compression schemes include gzip and Deflate. This means that when it is in use, your bandwidth costs for serving the site, will be lower because people visiting the site will be downloading smaller files.
Using GZip, takes time and processor power to zip and unzip the files, but typically this is not a problem because the time it takes to do that, is often less than the time that is saved by downloading a smaller file. Therefore the overall effect is a time saving, despite the browser having to unzip the file.
This post illustrates spring security under Spring Boot 2.1.4 with gradle 3.
There are many approaches to do restful call, e.g. Spring RestTemplate.
Solr 7.6
In the Apache Solr MySql Hello World, we import data from MySQL to Solr
which is full import, that is import all data from DB.
This post describes how to configure git server on centos 7.
Integrate Apache Shiro into spring boot 2.
In spring mvc, we can utilize JSR 303 and JSR 380 specification to make validation easier.
Note: If you already depend on spring-boot-starter-web, then you already have Spring Validation.
Otherwise, you’ll have to include spring-context.
An HTTP cookie is a small piece of data that a server sends to the user’s web browser.
The browser stores it(if it is enabled) and send it back to the same server in subsequent each request inside a Cookie HTTP header, even including requests for assets like images or CSS / JavaScript files.
Spring provides a cache abstraction which user can add/change concerete cache implementation easily.
Suppose there are two web projects: test4 and test5, the login page is in test4 and when user access resources of test5, he/she will
be redirected to login page of test4 if he/she has not login yet.
Apache Shiro is a powerful and easy-to-use Java security framework that performs authentication, authorization, cryptography, and session management.
This example is base on spring boot 2, spring mvc, mybatis, mysql.
Please refer :
Please refer journaldev for detail
In brief,
Java is always pass by value, actually we can call it:
Http protocol is a stateless, that is each request is a new request.
As we know, the index is used to provide an ordered indexed data.
There are 5 most recommended design principles when building your application. They are called S.O.L.I.D
There are different relationships between objects.
According to GoF Facade design pattern is:
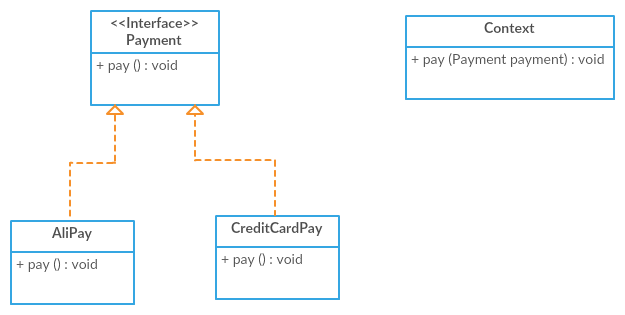
Adapter pattern works as a bridge between two incompatible/unrelated interfaces/classes.
Generics were introduced to the Java language to provide tighter type checks at compile time and to support generic programming.
The generics looks like:
  List<String> list = new ArrayList<>();
  //add item to list
  String s = list.get(0);
or
  public class Box<T> {
	    // T stands for "Type"
	    private T t;
      //other code
	}
The most commonly used type parameter names are:
  E - Element (used extensively by the Java Collections Framework)
  K - Key
  N - Number
  T - Type
  V - Value
  S,U,V etc. - 2nd, 3rd, 4th types
MySQL 5.7 InnoDB
MySQL 5.7 InnoDB
This post is for MySQL 5.7 InnoDB.
Spring has following transaction propagation behaviors:
manager-script in tomcat-users.xmlIn spring, there are two approaches to get value in runtime:
Redis has two perstince modes:
The query cache is deprecated as of MySQL 5.7.20, and is removed in MySQL 8.0.
e.g. hash(“hello”) will generate hash value ‘2cf24dba5’, two same plain text have same hash values.
In order to create different hash values despite same original string as well as making hacker harder to steal password, we can randomize the hash by appending or prepending a random string, call a salt, to the password before hashing, for example, hash(“hello”+”abc123”), here abc123 is the salt.
In practice, the salt is stored in DB as a separate column or as part of the hash string itself.
The salt does not need to be secret.
For more details, please refer to this
Pagination consist of logical and physical.
Test-driven development

As its name implies, it is a wiki which can be used in a company to share knowldege.
It’s web-based and database is not required.
Another is MediaWiki.
Take nexus oss 3 for example, maven settings.xml looks like:
<?xml version="1.0" encoding="UTF-8"?>

<settings xmlns="http://maven.apache.org/SETTINGS/1.0.0" xmlns:xsi="http://www.w3.org/2001/XMLSchema-instance" xsi:schemaLocation="http://maven.apache.org/SETTINGS/1.0.0 http://maven.apache.org/xsd/settings-1.0.0.xsd">

<servers>

<!-- used for deploy artifact to nexus release or snapshots repository -->
<server>
<id>nexus</id>
<username>admin</username>
<password>admin123</password>
</server>
</servers>

<mirrors>
<mirror>
<id>nexus</id>
<mirrorOf>*</mirrorOf>
<url>http://192.168.2.102:8081/repository/maven-public</url>
</mirror>
</mirrors>

<profiles>

<!-- set maven default java compiler version -->
<profile>
<id>jdk-1.8</id>
<activation>
<activeByDefault>true</activeByDefault>
<jdk>1.8</jdk>
</activation>
<properties>
<maven.compiler.source>1.8</maven.compiler.source>
<maven.compiler.target>1.8</maven.compiler.target>
<maven.compiler.compilerVersion>1.8</maven.compiler.compilerVersion>
</properties>
</profile>

<profile>
<id>nexus</id>
<repositories>
<repository>
<id>central</id>
<url>http://central</url>
<releases><enabled>true</enabled></releases>
<snapshots><enabled>true</enabled></snapshots>
</repository>
</repositories>
<pluginRepositories>
<pluginRepository>
<id>central</id>
<url>http://central</url>
<releases><enabled>true</enabled></releases>
<snapshots><enabled>true</enabled></snapshots>
</pluginRepository>
</pluginRepositories>
</profile>
</profiles>

<activeProfiles>
<activeProfile>nexus</activeProfile>
</activeProfiles>

</settings>
<servers> tag is a list of authentication profiles, keyed by the server-id used within the system. Authentication profiles can be used whenever maven must make a connection to a remote server.
<server> specifies the authentication information to use when connecting to a particular server, identified by a unique name within the system (referred to by the ‘id’ attribute below).
NOTE: You should either specify username/password OR privateKey/passphrase, since these pairings are used together.
<mirrors> is a list of mirrors to be used in downloading artifacts from remote repositories.
It works like this: a POM may declare a repository to use in resolving certain artifacts.
However, this repository may have problems with heavy traffic at times, so people have mirrored it to several places.
That repository definition will have a unique id, so we can create a mirror reference for that repository, to be used as an alternate download site. The mirror site will be the preferred server for that repository.
<mirror> specifies a repository mirror site to use instead of a given repository. The repository that this mirror serves has an ID that matches the mirrorOf element of this mirror. IDs are used for inheritance and direct lookup purposes, and must be unique across the set of mirrors.
profiles is a list of profiles which can be activated in a variety of ways, and which can modify the build process. Profiles provided in the settings.xml are intended to provide local machine-specific paths and repository locations which allow the build to work in the local environment. For example, if you have an integration testing plugin - like cactus - that needs to know where your Tomcat instance is installed, you can provide a variable here such that the variable is dereferenced during the build process to configure the cactus plugin. As noted above, profiles can be activated in a variety of ways. One way - the activeProfiles section of this document (settings.xml) - will be discussed later. Another way essentially relies on the detection of a system property, either matching a particular value for the property, or merely testing its existence. Profiles can also be activated by JDK version prefix, where a value of ‘1.4’ might activate a profile when the build is executed on a JDK version of ‘1.4.2_07’. Finally, the list of active profiles can be specified directly from the command line. NOTE: For profiles defined in the settings.xml, you are restricted to specifying only artifact repositories, plugin repositories, and free-form properties to be used as configuration variables for plugins in the POM.
profile Specifies a set of introductions to the build process, to be activated using one or more of the mechanisms described above. For inheritance purposes, and to activate profiles via <activatedProfiles/> or the command line, profiles have to have an ID that is unique. An encouraged best practice for profile identification is to use a consistent naming convention for profiles, such as ‘env-dev’, ‘env-test’, ‘env-production’, ‘user-jdcasey’, ‘user-brett’, etc. This will make it more intuitive to understand what the set of introduced profiles is attempting to accomplish, particularly when you only have a list of profile id’s for debug.
maven-public is a repository group. From next screenshot, we can see that:
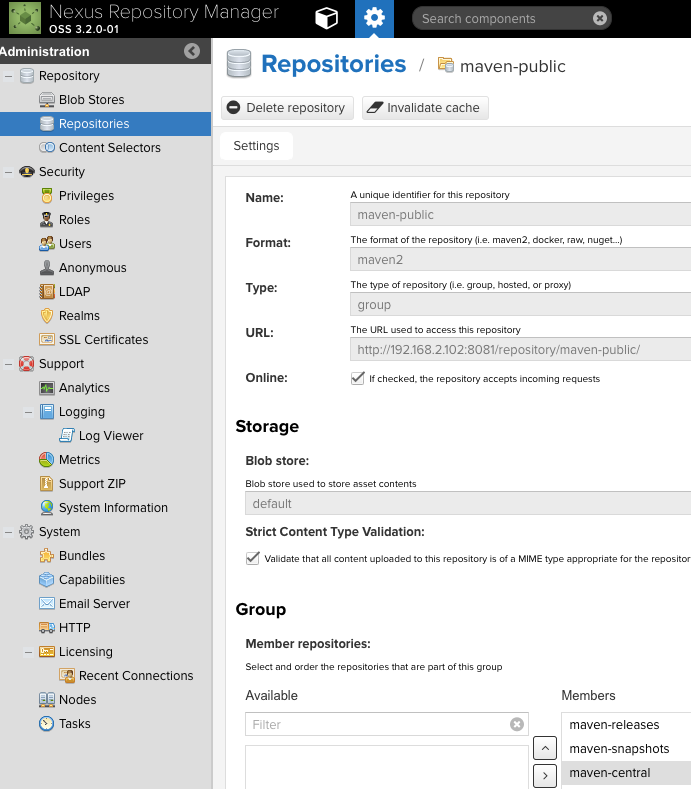
type of maven-public is group and it has three members: maven-releases, maven-snapshots and maven-central.
group means we can just use group(e.g.maven-public) in maven settings.xml to represent all its members, such that we don’t need to define all repository urls in settings.xml and it will download jars from its members according to the definition order, e.g. maven-snapshots has a.jar, we use maven-public in settings.xml, then it can download a.jar from nexus.
However we cannot upload artifact to group.
maven-releases and maven-snapshots are hosted repository. They are used for storing our own artifacts, for instance our company jars, or 3rd party which cannot downloaded from public maven repository.
maven-central is proxy repository which means nexus look for jars from it, if it has, then download jar from maven-central, if it has not, then download jar from public maven repository(https://repo1.maven.org/maven2/) and keep it in maven-central.
Upload own artifact to nexus by following configuration in project pom.xml:
<distributionManagement>
<repository>
<id>nexus</id>
<name>Releases</name>
<url>http://192.168.2.102:8081/repository/maven-releases/</url>
</repository>
<snapshotRepository>
<id>nexus</id>
<name>Snapshot</name>
<url>http://192.168.2.102:8081/repository/maven-snapshots/</url>
</snapshotRepository>
</distributionManagement>
then run maven deploy command.
(client -> forward proxy) -> target server
client cannot access target server directly, therefore use forward proxy to get client request and forward it to target.
client knows forward proxy and target server, while target server only knows forward proxy.
The client must be configured to use the forward proxy to access other sites.
It also can use caching to reduce the network usage.
client -> (reverse proxy -> other server)
for client, it only knows reverse proxy and reverse proxy is target server for it, it just let other server to handle the client requests.
No configuration in client is necessary.
A typical usage is load balance
sudo tar xvzf nexus-3.2.0-01-unix.tar.gz -C /opt
sudo chmod -R 777 sonatype-work
./nexus runIn this case, we need to press ctrl+c keys to stop it.
http://localhost:8081
In order to make it start automatically after server reboot, we need to make it as service.
It is a good practice to run that service as a specific user that has only required access rights rather than root user.
We can configure the repository manager to run as a service with init.d or systemd. Both are startup frameworks used in Linux-based systems such as Ubuntu and CentOS.
sudo vi /opt/nexus/bin/nexus.rcmake previous file looks like
run_as_user="linux user"
create link
sudo ln -s /opt/nexus/bin/nexus /etc/init.d/nexus
config init.d
cd /etc/init.d
sudo chkconfig --add nexus
sudo chkconfig --levels 345 nexus on
sudo service nexus start
The second command adds nexus as a service to be started and stopped with the command. chkconfig manages the symbolic links in /etc/rc[0-6].d which control the services to be started and stopped when the operating system restarts or transitions between run-levels. The third command adds nexus to run-levels 3, 4, and 5. Then the service command starts the repository manager.
sudo firewall-cmd --zone=public --permanent --add-service=http
sudo firewall-cmd --zone=public --add-port=8081/tcp --permanent
sudo firewall-cmd --reload
Symbolic link or called soft link, is a file which points to another file or directory, just like a pointer.
It does not contain data of target file, while hard link does.
Soft link is able to link to file/directory of remote computer and hard just link file on the same filesystem.
If we delete or move the target file, soft link becomes unusable, whereas hard link keeps the content of that file.
create soft link command:
[code]ln -s target_file soft_link_file[/code]
we can do operations on soft_link_file, e.g. cp, rm, just as we can do on target_file.
create hard link:
[code]ln target_file hard_link_file[/code]
install httpd(apache)
sudo yum install httpd
Logs files are in /var/log/httpd
install svn and apache module mod_dav_svn to make svn work with apache
sudo yum install subversion mod_dav_svn
modify svn configuration file
sudo vi /etc/httpd/conf.modules.d/10-subversion.conf
append the following content
<Location /svn>
DAV svn
SVNParentPath /svn
AuthName "SVN Repos"
AuthType Basic
AuthUserFile /etc/svn/svn-auth
AuthzSVNAccessFile /svn/authz
Require valid-user

</Location>
<Location> applies the enclosed directives only to matching URLs
Syntax: <Location URL-path|URL> ... </Location>

In the example below, requests to /private1, /private1/ and /private1/file.txt will have the enclosed directives applied,    but /private1other would not.

<Location "/private1">
# ...
</Location>

While for following example, requests to /private2/ and /private2/file.txt will have the enclosed directives applied, but    /private2 and /private2other would not.

<Location "/private2/">
# ...
</Location>
DAV svn
Must be included in any Directory or Location block for a Subversion repository. It tells httpd to use the Subversion
backend for mod_dav to handle all requests.
SVNParentPath directory-path
Specifies the location in the filesystem of a parent directory whose child directories are Subversion repositories. In a configuration block for a Subversion repository, either this directive or SVNPath must be present, but not both.
SVNPath directory-path
Specifies the location in the filesystem for a Subversion repository’s files. In a configuration block for a Subversion
repository, either this directive or SVNParentPath must be present, but not both.
AuthName is an arbitrary name that you choose for the authentication domain. Most browsers display this name in the
dialog box when prompting for username and password.
AuthType specifies the type of authentication to use.
AuthUserFile specifies the location of the password file to use.
AuthzSVNAccessFile specifies a file containing the permissions policy for paths within your repositories.
create svn repo
sudo mkdir /svn
cd /svn
sudo svnadmin create test
sudo chown -R apache:apache test
add svn user
sudo mkdir /etc/svn
sudo htpasswd -cm /etc/svn/svn-auth admin
sudo chown root:apache /etc/svn/svn-auth
sudo chmod 640 /etc/svn/svn-auth
if you want to add second user
sudo htpasswd -m /etc/svn/svn-auth user1
remove c flag, just use -m from second user
set permission for users
sudo cp /svn/test/conf/authz /svn/authz

sudo vi /svn/authz
test is the repository name which created on step 4.
In this file, add follwing content:
[/]
* = rw
This means all user can read and write all repositories, this suit for most case.
However, following config called path-based authorization which used to restrict the access to svn files. You need to ask yourself that do you really need it before using it or it’s just something that sounds good, because there are often invisible or visible costs associated with this feature.
[groups]
admin=admin
repo1_user=user1,user2
[/]
@admin=rw

[test:/]
@repo1_user=rw
In this file, [groups] is used to defined user group, e.g. repo1_user is group name, user1 is its user.
[/] or [test:/] is svn repository path, its value can be [repos-name:path] or [path] when AuthzSVNAccessFile is
used.
If you configured per repository access files via AuthzSVNReposRelativeAccessFile directive, you should always use
[path] form only.
[repos-name:path] or [path] describe the permission of group or user for path, @admin=rw means admin is a group and
it can read and write, while admin=r represents admin is a user and it only can read.
If the user is not mentioned at all, no access is allowed.
If you’re using the SVNParentPath directive, it’s important to specify the repository names in your sections. If you omit
them, a section such as [/some/dir] will match the path /some/dir in every repository. If you’re using the SVNPath
directive, however, it’s fine to provide only paths in your sections—after all, there’s only one repository.
change selinux security context if selinux enabled
403 forbidden will be thrown withoud next modification.
sudo chcon -R -v –-type=httpd_sys_content_t /svn
start appache
sudo systemctl start httpd.service
if you want apache start automatically when system boot, then we can use
sudo systemctl enable httpd.service
modify firewall such that other computers can access the svn
sudo firewall-cmd --zone=public --permanent --add-service=http
sudo firewall-cmd --reload
Finally, we can access svn from browser by http://svn/test.
Reference websites:
http://svnbook.red-bean.com/en/1.7/svn.ref.mod_dav_svn.conf.html
http://svnbook.red-bean.com/en/1.8/svn.serverconfig.pathbasedauthz.html
https://httpd.apache.org/docs/2.4/mod/core.html#location
http://svnbook.red-bean.com/en/1.7/svn.serverconfig.httpd.html
struts 2.0.9
The value is
AÜC
jsp
obj.value = "<s:property value='customer.name'/>"
obj represents an input field.
However, this input field value displayed as
[code]A& #xDC;C[/code]
AÜC is got from DB and it is correct in struts action. Meanwhile if I just assign “AÜC” to obj.value in jsp, it also can show right string.
Therefore the problem is from .
I tried to add escapeHtml=’false’ to “<s:property value=’customer.name’ />”, but the jsp throws an exception and stop running.
Eventually,
I found that if we put
[code]<s:property value=’customer.name’ />[/code]
in element value attribute, e.g.
[code]<input value="<s:property value=’customer.name’ />" />[/code]
,
then it’s normal.
But if we use it in js, for example,
[code]
<script>
obj.value = "<s:property value=’customer.name’ />";
</script>
[/code]
then it will show in-normal value, in this case we need to use jstl
[code]
<script>
obj.value = ${customer.name}";
</script>
[/code]
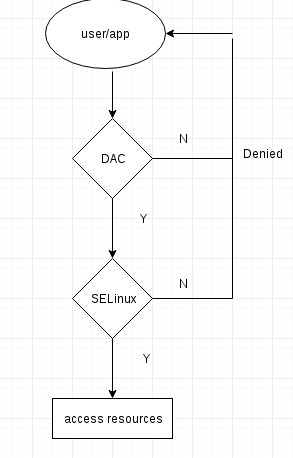
Users may use the ‘sestatus’ command to view the current SELinux status:
$ sestatus SELinux status: enabled SELinuxfs mount: /sys/fs/selinux SELinux root directory: /etc/selinux Loaded policy name: targeted Current mode: enforcing Mode from config file: enforcing Policy MLS status: enabled Policy deny_unknown status: allowed Max kernel policy version: 28
$ ls -Z drwxr-xr-x. frank frank unconfined_u:object_r:user_home_t:s0 Desktop unconfined_u:object_r:user_home_t:s0 is SELinux security context fields, unconfined_u means user, object_r represents role, user_home_t stands for (security context) type, s0 is mls which is not common used.
There are some reasons why SELinux deny access :
The first three we can deal with.
Take apache accessing /svn/authz for example,
ps axZ | grep httpd system_u:system_r:httpd_t:s0 5166 ? Ss 0:00 /usr/sbin/httpd -DFOREGROUND system_u:system_r:httpd_t:s0 5181 ? S 0:00 /usr/sbin/httpd -DFOREGROUND system_u:system_r:httpd_t:s0 5182 ? S 0:00 /usr/sbin/httpd -DFOREGROUND system_u:system_r:httpd_t:s0 5183 ? S 0:00 /usr/sbin/httpd -DFOREGROUND system_u:system_r:httpd_t:s0 5184 ? S 0:00 /usr/sbin/httpd -DFOREGROUND system_u:system_r:httpd_t:s0 5185 ? S 0:00 /usr/sbin/httpd -DFOREGROUND system_u:system_r:httpd_t:s0 5350 ? S 0:00 /usr/sbin/httpd -DFOREGROUND system_u:system_r:httpd_t:s0 5351 ? S 0:00 /usr/sbin/httpd -DFOREGROUND system_u:system_r:httpd_t:s0 5352 ? S 0:00 /usr/sbin/httpd -DFOREGROUND unconfined_u:unconfined_r:unconfined_t:s0-s0:c0.c1023 5362 pts/0 S+ 0:00 grep --color=auto httpd
httpd_t is the selinux type of httpd.
cd /svn ls -Z -rw-r--r--. root root unconfined_u:object_r:default_t:s0 authz
default_t is the type of /svn/authz file.
For SELinux, access is only allowed between similar types, so apache running as httpd can access type httpd_sys_content, but cannot read /svn/authz because the directory and file(s) have wrong security context even though user give 777 permission for it via DAC.
In order to let apache access this file, we need to set correct security context type ‘httpd_sys_content_t’ by following command:
sudo chcon -Rv --type=httpd_sys_content_t /svn
-R means recursive.
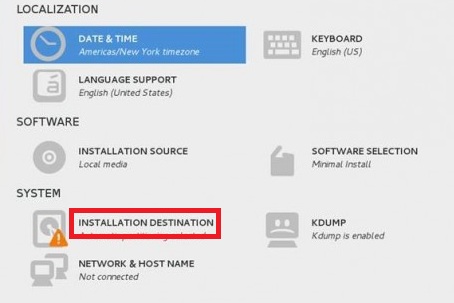

In my case, the windows 7 has three drivers C, D and E. Wherein E is empty. So I

reboot the system.
Note : the diagrams in this article are from web.
In js, there is a function “replace(source, target)” which means replace the source of original with target.
Wherein source can be a plain string or regular expression, e.g.
var s = " You can click this link to access detail : ${url=http://192.168.0.1/TEST/a?} "; var t = s.replace(/\${url=([^+]+)}/,"");
if source is regular expression :
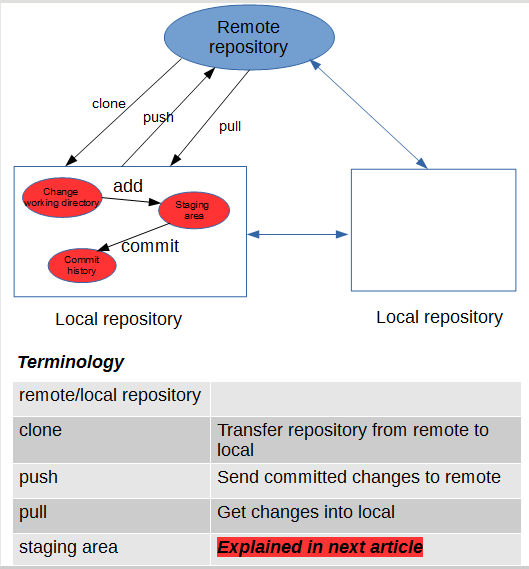
Git is the distributed version control system. Git is responsible for keeping track of changes to
content (usually source code files), and it provides mechanisms for sharing that content with others.
GitHub is a company that provides Git repository hosting.
files in git : tracked, untracked and ignored.
ignored files are tracked in a special file name .gitignore (can be for specify repository
or all repositories by git config) that is checked in at the root of your repository.
There is no explicit git ignore command, instead the .gitignore file must be edited and
committed by hand when you have new files that you wish to ignore.
.gitnore files contain patterns that are matched against file names in your repository to determine
whether or not they should be ignored.
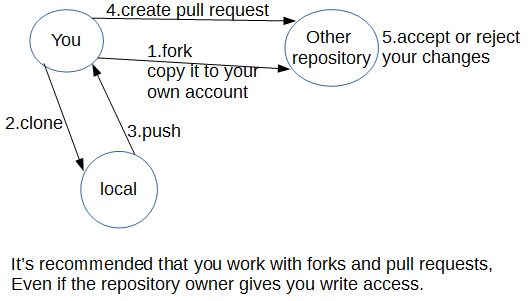
When we work with another user’s public repository, typically we have read access to the code but not write access. In order to change their code, we have to create pull request. The flow is :
Currently, maven uses jdk 1.5 by default, that is even we specify JDK and compiler in eclipse, if we check out/create maven project, or update maven project or clean install, it will use jdk 1.5 rather than eclipse settings. This is not convenient and has error sometimes if we use higher jdk.
In order to use specified jdk, we can add following to maven settings.xml such that it uses jdk 1.7:
<profile>
<id>jdk-1.7</id>
<activation>
<activeByDefault>true</activeByDefault>
<jdk>1.7</jdk>
</activation>
<properties>
<maven.compiler.source>1.7</maven.compiler.source>
<maven.compiler.target>1.7</maven.compiler.target>
<maven.compiler.compilerVersion>1.7</maven.compiler.compilerVersion>
</properties>
</profile>
Following web sites describe the java expression language(EL) :
1.What
JSTL(JSP Standard Tag Library) is a collection of useful jsp tags which to handle jsp applications.
<c:xxx> tags to control the flow in the jsp page.
<fmt:xxx> tags for date/number formatting and i18n.
<sql:xxx> tags for sql operation
<x:xxx> for handling xml
${fn:xxx()} are some utility EL functions.
2.How
JSTL is part of the Java EE API and included in Java EE application servers like TomEE, Glassfish, but not in servelet containers such as Tomcat, Jetty.
Developers need to call commit() explicitly such that changes can be stored in DB. While for rollback(), we don’t have to call it in most of the time as mybatis will do that for us if we don’t call commit.
However if we need more fine grained control over a session where multiple commits and rollbacks are possible, we are able to use rollback.
Mybatis-spring allows mybatis to participate in spring transactions.
In this case, there is no need to call commit or rollback explicitly and UnsupportedOperationException will thrown if we do that.
In order to use spring transaction, the additional changes as follows :
spring config file looks like
<beans xmlns="http://www.springframework.org/schema/beans" xmlns:xsi="http://www.w3.org/2001/XMLSchema-instance"
       xmlns:tx="http://www.springframework.org/schema/tx" xsi:schemaLocation="http://www.springframework.org/schema/beans
 http://www.springframework.org/schema/beans/spring-beans-4.0.xsd http://www.springframework.org/schema/tx
 http://www.springframework.org/schema/tx/spring-tx-4.0.xsd">

<tx:annotation-driven transaction-manager="transactionManager"/>

<bean id="dataSource" class="org.springframework.jndi.JndiObjectFactoryBean">
<property name="jndiName" value="java:/comp/env/jdbc/example" />
</bean>

<bean id="sqlSessionFactory" class="org.mybatis.spring.SqlSessionFactoryBean">
<property name="configLocation" value="classpath:mybatis-config.xml" />
<property name="dataSource" ref="dataSource" />
</bean>

<bean id="sqlSession" class="org.mybatis.spring.SqlSessionTemplate">
<constructor-arg index="0" ref="sqlSessionFactory" />
</bean>

<bean id="transactionManager" class="org.springframework.jdbc.datasource.DataSourceTransactionManager">
<property name="dataSource" ref="dataSource" />
</bean>

</beans>
Group sql statements into a batch and submit them with one call to DB, rather than send each statement one by one, this is batch processing.
Batch processing can reduce the amount of communication overhead, thereby improving performance.
It is faster than sending them one by one without waiting for each one to finish, and the DB may be execute some of them in parallel.
In mybatis, we have two approaches to implement batch processing:
if integrate mybatis and spring
<bean id="sqlSession" class="org.mybatis.spring.SqlSessionTemplate">
   <constructor-arg index="0" ref="sqlSessionFactory" />

   <constructor-arg index="1" value="BATCH" />

</bean>
then in code :
for() {

   sqlSession.update();

}
without spring
SqlSession session = factory.openSession(ExecutorType.BATCH);
for(Child c : childs) {

  session.update("updateChild", c);

}

session.commit();
<context-param>

<param-name>contextConfigLocation</param-name>

<!-- the applicationContext.xml should be placed under WEN-INF by default. However we can use <context-param> to declare it is in src/main/resource with classpath:applicationContext.xml-->

<param-value>classpath:applicationContext.xml</param-value>

</context-param>

<listener>

<!-- Following listener is used to load the spring context file. -->

<listener-class>

org.springframework.web.context.ContextLoaderListener

</listener-class>

</listener>

<filter>

<filter-name>struts2</filter-name>

<!-- struts2 filter class path may be differ in different version-->

<filter-class>

org.apache.struts2.dispatcher.filter.StrutsPrepareAndExecuteFilter

</filter-class>

</filter>

<filter-mapping>

<filter-name>struts2</filter-name>

<url-pattern>/*</url-pattern>

</filter-mapping>
<bean id="helloworld" class="example.my.integration.struts.HelloWorld">

<!-- add sqlSession in action class in this case, because we will query db from action class directly with the help of sqlSession -->

<property name="sqlSession" ref="sqlSession" />

</bean>

<bean id="dataSource"

class="org.springframework.jndi.JndiObjectFactoryBean">

<!-- Using JndiObjectFactoryBean such that we can define db resource in tomcat context.xml without configuring in project. Meanwhile we don't need to use any code to do lookup jndi or connect db, just use mybatis sqlSession api to operate db-->

<property name="jndiName" value="java:/comp/env/jdbc/example" />

</bean>

<!-- integrate spring with mybatis by using following two beans -->

<bean id="sqlSessionFactory"

class="org.mybatis.spring.SqlSessionFactoryBean">

<property name="configLocation" value="classpath:mybatis-config.xml" />

<property name="dataSource" ref="dataSource" />

</bean>

<bean id="sqlSession" class="org.mybatis.spring.SqlSessionTemplate">

<constructor-arg index="0" ref="sqlSessionFactory" />

</bean>
When application needs to operate the database, it has to create a connection and close it after finishing.
This is costly and waste resources as well as affect the performance for each user/request.
Therefore, this is why connection pool comes. It is a cache of database connection so that connection can be reused.
Connection is placed in the pool after it is created or the operation finished. It is used again so that a new connection does not have to be established.
Generally, the pool has min/initial and max connection, if it reaches the initial number, then a new connection will be created and placed in pool. While it reaches max number, then new operations has to wait current operation release the connection.
There are some connection pool products, such as c3p0, DBCP.
Take c3p0 with spring and mybatis for example.
The context.xml of tomcat looks like next :
  <Resource name="jdbc/test" auth="Container"
  type="com.mchange.v2.c3p0.ComboPooledDataSource"
  factory="org.apache.naming.factory.BeanFactory"
  user="test"
  password=""
  jdbcUrl="jdbc:mysql://localhost:3306/test"
  driverClass="com.mysql.jdbc.Driver"
  minPoolSize="2"
  initialPoolSize="3"
  maxPoolSize="10" />
Spring config file is :
  <bean id="dataSource" class="org.springframework.jndi.JndiObjectFactoryBean">
    <property name="jndiName" value="java:/comp/env/jdbc/test" />
  </bean>

  <bean id="sqlSessionFactory" class="org.mybatis.spring.SqlSessionFactoryBean">
    <property name="configLocation" value="classpath:config/mybatis-config.xml" />
    <property name="dataSource" ref="dataSource" />
  </bean>

  <bean id="sqlSession" class="org.mybatis.spring.SqlSessionTemplate">
    <constructor-arg index="0" ref="sqlSessionFactory" />
  </bean>
Take following code for example,
Statement st = conn.createStatement(); String query = "select * from table where userName='" + user + "'"; st.executeQuery(query);
For above code, if value of user is : a’ or ‘1’ = ‘1, then the sql will be : select * from table where userName=’a’ or ‘1’=’1’, as we know, this where clause always return true, this is sql injection.
We can use PreparedStatement with placeholder to solve this problem, the code looks like :
PreparedStatement pstmt = con.prepareStatement("select * from table where userName=?"); pstmt.setString(1,user);
the setXX method do all the validation and escaping the special character.
Now, if user still input value : a’ or ‘1’ = ‘1, the sql is : select * from table where userName=’a\, or '1'='1’
When we use ORM tool like mybatis, it uses PreparedStatement if #{} be used in sql.
However, ${} is interpreted as string substitution, hence it has risk of sql injection.
Interceptor is used for doing additional handling before/after calling action method.
there are two ways to define interceptors :
<interceptors>
 <interceptor name="first" class="example.my.interceptor.MyInterceptor" />
 <interceptor name="second"        class="example.my.interceptor.AnotherInterceptor" />
</interceptors>
<action name="empinfo" class="example.my.i18n.EmpInfo" method="execute">
 <result name="input">/index.jsp</result>
 <interceptor-ref name="timer" />
 <interceptor-ref name="first" />
 <interceptor-ref name="second" />
</action>
wherein, ‘timer’ is built-in interceptor which is used for recording the execution time for action method, so there is no need to declare it in <interceptors>
For custom interceptors, we are supposed to declare in <interceptors>
<interceptors>
 <interceptor name="first" class="example.my.interceptor.MyInterceptor" />
 <interceptor name="second" class="example.my.interceptor.AnotherInterceptor" />
 <interceptor-stack name="myStack">
 <interceptor-ref name="second" />
 <interceptor-ref name="first" />
 </interceptor-stack>
</interceptors>
<action name="empinfo" class="example.my.i18n.EmpInfo" method="execute">
 <result name="success">/success.jsp</result>
 <interceptor-ref name="myStack" />
</action>
custom interceptor has to extend AbstractInterceptor or implement Interceptor :
public class MyInterceptor extends AbstractInterceptor{
private static final long serialVersionUID = -3169055473033684813L;

@Override
public String intercept(ActionInvocation invocation) throws Exception {
System.out.println(" MyInterceptor pre-processing before calling execute()");

invocation.invoke();

System.out.println("MyInterceptor post-process after calling execute()");
return null; }

}
public class AnotherInterceptor implements Interceptor{
private static final long serialVersionUID = 1761916853142898972L;

@Override public void destroy() { }

@Override public void init() { }

@Override public String intercept(ActionInvocation invocation) throws Exception {
System.out.println(" AnotherInterceptor pre-processing before calling execute()");

invocation.invoke();

System.out.println("AnotherInterceptor post-process after calling execute()");
return null; }

}
the invocation.invoke() will call other interceptor or actual action method.
The order of interceptor calling is the same as order of interceptor definition, take 2.1 for example, the output is :
MyInterceptor pre-processing before calling execute()
AnotherInterceptor pre-processing before calling execute()

action method is exectuting !
AnotherInterceptor post-process after calling execute()
MyInterceptor post-process after calling execute()
Internationalization(aka I18n) is done via message resource(also called resource bundle) and locale.
Message resource is a properties file which looks like next:
personBean.firstName=Nombre
personBean.lastName=Apellidos
thankyou=Gracias por registrarse, %{personBean.firstName}.
In struts2, this file has three level:
Class Level
The name of properties file has to be same as struts action class as well as the package.
For example, there is action src/main/java/example/struts2/Login.java, then the properties file should be src/main/resources/example/struts2/Login.properties
This rule is suited for interface too.
Package Level
properties file name is package.properties, cannot be other names.
For instance, package.properties placed under src/main/resources/example/struts, then all class under package
example.struts or its sub-packages can use this resource file.
Global Level
For this level, developer need to declare the global properties file in struts.xml like
The search order is : 1 -> 2 -> 3.
For example, there is example.struts2.i18n.Login.Java, the order is: Search Login.properties under the example.struts2.i18n, if there is not, then search the package.properties under the example.struts2.i18n, if not, search package.properties under the example.struts2, etc.
The framework supports message resource in the following places:
<s:textfield key="properties-file-key-name" />
<s:text name="properties-file-key-name" />
<s:property value="getText('some.key')" />
<s:i18n name="example.struts.i18n.p"></s:i18n><s:text name="user.name" /></s:i18n> it ask for user.name message from example/struts/i18n/p.propertieswithin action class through the getText() method
public void validate(){
      if("".equals(getUsername())){
           addFieldError("username", getText("username.required"));
      }

 }
If you don’t need to use the package-scan-functionality and only base on the global bundles (those provided by the framework and via struts.custom.i18n.resources) you can use existing GlobalLocalizedTextProvider implementation. To use this please define the following option in your struts.xml:
<constant name="struts.localizedTextProvider" value="global-only" />
If you want use a different logic to search for localized messages, or you want to use a database or just want to
search default bundles, you must implement both those interfaces (or subclass the existing implementations). You can check a small example app how to use both. Please remember that the TextProvider interface is implemented by the ActionSupport class, that’s why an extra layer - TextProviderFactory - is needed.
By default, struts2 uses the user’s default locale.
The convention of properties file name is File-name_locale-code.properties, such as A_zh-CN.properties.
If locale is en for English then locale code can be ignored.
Developer is able to set locale value by parameter request_locale.
```Java Server Pages
Change language to chinese simplified
```
By specifying the locale as a url parameter, it tells struts to look for property files ends with zh-CN.
Following is the info from struts official doc about the I18n Interceptor:
An interceptor that handles setting the locale specified in a session as the locale for the current action request. In addition, this interceptor will look for a specific HTTP request parameter and set the locale to whatever value is
provided, it also looks for specific cookie to read locale from. This means that this interceptor can be used to allow for your application to dynamically change the locale for the
user’s session or, alternatively, only for the current request. This is very useful for applications that require multi-lingual support and want the user to be able to set his or her language preference at any point. The locale parameter is removed during the execution of this interceptor, ensuring that properties aren’t set on an action (such as request_locale) that have no typical corresponding setter in your action. For example, using the default parameter name, a request to foo.action?request_locale=en_US, then the locale for US
English is saved in the user’s session and will be used for all future requests. If there is no locale set (for example with the first visit), the interceptor uses the browser locale. Parameters parameterName (optional) - the name of the HTTP request parameter that dictates the locale to switch to and save in the session. By default this is request_locale requestCookieParameterName (optional) - the name of the HTTP request parameter that dictates the locale to switch to and save in a cookie. By default this is request_cookie_locale requestOnlyParameterName (optional) - the name of the HTTP request parameter that dictates the locale to switch to for the current request only, without saving it in the session. By default this is request_only_locale attributeName (optional) - the name of the session key to store the selected locale. By default this is
WW_TRANS_I18N_LOCALE localeStorage (optional) - the name of storage location, it can be none, session or cookie. By default this is session Examples<interceptor name="i18nCookie" class="org.apache.struts2.interceptor.I18nInterceptor"/> <action name="someAction" class="com.examples.SomeAction"> <interceptor-ref name="i18nCookie"> <param name="localeStorage">cookie</param> </interceptor-ref> <interceptor-ref name="basicStack"/> <result name="success">good_result.ftl</result> </action>
## Front-end I18n
There is also front-end I18n, like Jquery I18n
There is a good article about the i18n in DB, please refer it for detail.
struts version is 2.3.28
1.project structure
create a dynamic web project in Eclipse, then convert it to maven project and add sturts-core 2.3.28 dependency. the final project explorer looks like next :

2.View page
2.1.index.jsp
<%@ page language="java" contentType="text/html; charset=ISO-8859-1"
pageEncoding="ISO-8859-1"%>;
<%-- the taglib directive tells the Servlet container that this page will be using the struts2 tags and that these tags will be preceded by s.--%>
<%@ taglib prefix="s" uri="/struts-tags" >
<!DOCTYPE html PUBLIC "-//W3C//DTD HTML 4.01 Transitional//EN" "http://www.w3.org/TR/html4/loose.dtd">
<html>
<head>
<meta http-equiv="Content-Type" content="text/html; charset=ISO-8859-1">
<title>Insert title here</title>
</head>
<body>
<h1>Hello World from Struts2</h1>
<!-- if we want to use DMI, then the action name can be hello!nonExecute.action or hello!nonExecute here-->
<form action="hello">
Please enter your name :<br>
<input type="text" name="name" />
<input type="submit" value="say hello" />
</form>
</body>
</html>
DMI(dynamic method invocation) means run non-execute method of action class, the above form action represents it will run execute() of action class. However, if action name is hello.nonExecute, then it runs nonExecute() of action class.
2.2.result page
<%@ page language="java" contentType="text/html; charset=ISO-8859-1"
pageEncoding="ISO-8859-1"%>
<%@ taglib prefix="s" uri="/struts-tags" %>
<!DOCTYPE html PUBLIC "-//W3C//DTD HTML 4.01 Transitional//EN" "http://www.w3.org/TR/html4/loose.dtd">

<html>
<head>
<meta http-equiv="Content-Type" content="text/html; charset=ISO-8859-1">
<title>Insert title here</title>
</head>
<body>
<!-- the s:property tag displays the value of action class property 'name' which is returned by the method getName() of HelloWorldAction -->
Struts2 Hello World, <s:property value="name" />
</body>
</html>
3.action class
public class HelloWorldAction {

private String name;

public String getName() {
return name;
}

public void setName(String name) {
this.name = name;
}

public String execute() {

return "success";
}

public String nonExecute() {

return "fail";
}

}
4.config files
4.1.struts.xml
<?xml version="1.0" encoding="UTF-8"?>
<!-- next statement is required otherwise there is error when start tomcat -->
<!DOCTYPE struts PUBLIC "-//Apache Software Foundation//DTD Struts Configuration 2.0//EN"
"http://struts.apache.org/dtds/struts-2.0.dtd">
<struts>
<!-- set constant struts.devMode to true such that we can see some useful log messages -->
<constant name="struts.devMode" value="true" />
<!-- In struts2 2.3.28, DynamicMethodInvocation must be set to true explicitly if we want to use DMI -->
<constant name="struts.enable.DynamicMethodInvocation" value="true" />
<package name="helloworld" extends="struts-default">
<!-- property 'method' of action tag means executing which method of action class, default is execute() -->
<action name="hello" class="cn.my.example.HelloWorldAction"
>
<result name="success">/HelloWorld.jsp</result>
<!-- if invoked method return success then we take the user to HelloWorld.jsp -->
<result name="fail">/error.jsp</result>
</action>
</package>
</struts>
Note :
<constant name="struts.enable.DynamicMethodInvocation" value="true" /> has to be declared in struts.xml in order to use DMI.<action name="" class="">, the class value is qualified name, that is class="cn.my.example.HelloWorld". While if struts is integrated with spring, its value is the id value of <bean id=""> which defined in spring applicationContext.xml4.2.web.xml
<filter>
<filter-name>struts2</filter-name>
<!-- <filter-class>org.apache.struts2.dispatcher.FilterDispatcher</filter-class> -->
<!-- for struts2 2.3.28, the filter is next instead of above -->
<filter-class>org.apache.struts2.dispatcher.ng.filter.StrutsPrepareAndExecuteFilter</filter-class>
</filter>

<filter-mapping>
<filter-name>struts2</filter-name>
<url-pattern>/*</url-pattern>
</filter-mapping>
1.What is JNDI
1.
there is one sql as follows :
select /*+index(create_time) */ * from h where h.result='F' and h.code<>'DO' and (h.code like :1 or h.code like :2 or h.code like :3) and h.create_time>:4 and h.create_time<:5
it has index on column ‘create_time’, :1, :2 and :3 can be %A,A% or %A%.
DBA told us that this is top sql, hence we need to optimize it.
My analysis are :
Therefore, after removing hint and add index on column ‘result’, the efficient improved huge.
This is a hello world example with spring boot 2.
This is a very simple example, when user open it in the browser, index.jsp will be shown and user can click some buttons to fetch
data from controller.
		<dependency>
			<groupId>org.springframework.boot</groupId>
			<artifactId>spring-boot-starter-web</artifactId>
		</dependency>
		<dependency>
			<groupId>org.mybatis.spring.boot</groupId>
			<artifactId>mybatis-spring-boot-starter</artifactId>
			<version>1.3.2</version>
		</dependency>

		<dependency>
			<groupId>org.springframework.boot</groupId>
			<artifactId>spring-boot-devtools</artifactId>
			<scope>runtime</scope>
		</dependency>
		<dependency>
			<groupId>mysql</groupId>
			<artifactId>mysql-connector-java</artifactId>
			<scope>runtime</scope>
		</dependency>
		<dependency>
			<groupId>org.springframework.boot</groupId>
			<artifactId>spring-boot-starter-tomcat</artifactId>
			<scope>provided</scope>
		</dependency>
		<dependency>
			<groupId>org.springframework.boot</groupId>
			<artifactId>spring-boot-starter-test</artifactId>
			<scope>test</scope>
		</dependency>

		<dependency>
    		<groupId>org.apache.tomcat.embed</groupId>
    		<artifactId>tomcat-embed-jasper</artifactId>
    		<scope>provided</scope>
		</dependency>
**Note: tomcat-embed-jasper is used to compile jsp files in embeded tomcat. If it is ommitted, then jsp cannot be shown when you access it if you use embed tomcat. After adding this dependency, you have to restart your spring boot app manually. **
index.jsp is placed under src/main/webapp.
<!DOCTYPE html>
<html>
<head>
    <title>Hello SpringMVC</title>
    <script src="jquery-3.3.1.min.js"></script>
</head>
<body>
<input type="button" value="post json" onclick="getUser()" />
<input type="button" value="get user 2" onclick="getUser2()" />
<input type="button" value="get user 3" onclick="getUser3()" />
<script>
function getUser() {


	   var search = {
	      "userId" : 2
	   }

	   jQuery.ajax({
	      type: "POST",
	      contentType : 'application/json; charset=utf-8',
	      dataType : 'json',
	      url: "/sbw/user/getUser",
	      data: JSON.stringify(search),
	      success :function(result) {console.log(result);
	       alert(result.userName);
	     }
	  });
}

function getUser2() {


	   var search = {
	      "userId" : 2
	   }
	   //both post and get are ok
	   jQuery.ajax({
	      type: "GET",
	      url: "/sbw/user/getUser2",
	      data: search,
	      success :function(result) {console.log(result);
	       alert(result.userName);
	     }
	  });
}

function getUser3() {


	   var search = {
	      "userId" : 2
	   }

	 //both post and get are ok
	   jQuery.ajax({
	      type: "POST",
	      url: "/sbw/user/getUser3",
	      data: search,
	      success :function(result) {console.log(result);
	       alert(result.userName);
	     }
	  });
}
</script>
</body>
</html>
When you open website in browser by url ‘http://localhost:8080/sbw, the index.jsp or index.html will be lookuped under the root path or the path defined in spring.mvc.view.prefix. Alternatively, you can access index.jsp by 'http://localhost:8080/sbw.
It’s a good practice to place resources like jsp under the WEB-INF folder such that user cannot access them directly from the
browser by typing the url.
The Servlet 2.4 specification says this about WEB-INF:
A special directory exists within the application hierarchy named WEB-INF. This directory contains all things related to the application that aren’t in the document root of the application. The WEB-INF node is not part of the public document tree of the application. No file contained in the WEB-INF directory may be served directly to a client by the container. However, the contents of the WEB-INF directory are visible to servlet code using the getResource and getResourceAsStream method calls on the ServletContext, and may be exposed using the RequestDispatcher calls.
The change in Servlet 3.0 & 3.1 (JSR 340) allows serving static resources and JSPs from within a JAR stored in WEB-INF/lib.
Except for static resources and JSPs packaged in the META- INF/resources of a JAR file that resides in the WEB-INF/lib directory, no other files contained in the WEB-INF directory may be served directly to a client by the container.
Thus from Servlet 3.0, static files can be served from: WAR file > WEB-INF > lib > JAR file > META-INF > resources > yourStaticFilesGoHere
server:
  servlet:
    context-path: /sbw

spring:
  mvc:
    view:
      prefix: /
      suffix: .jsp
  datasource:
    url: jdbc:mysql://localhost:3306/test
    username: root
    password: 123456

mybatis:
  type-aliases-package: com.example.sb.model
  mapper-locations: classpath:sql/*.xml
  configuration:
    map-underscore-to-camel-case: true

logging.level:
  root: info
  java.sql.PreparedStatement: debug
  com.example.sb.dao: debug
@RestController
@RequestMapping("/user/")
public class UserAction {

	@Autowired
	private UserService userService;

	@RequestMapping(value = "getUser")
	public User getuser(@RequestBody User user) {

		return this.userService.getUser(user.getUserId());
	}

	@RequestMapping(value = "getUser2")
	public User getUser2(User user) {

		return this.userService.getUser(user.getUserId());
	}

	//@RequestParam cannot be ommited in this case
	@RequestMapping(value = "getUser3")
	public User getUser3(@RequestParam Map<String,Object> map) {

		return this.userService.getUser(Integer.valueOf(map.get("userId").toString()));
	}

}
It can be applied to the controller class as well as methods.
It is used to map web requests onto specific handler classe and/or handler method.
You can define the request method like @RequestMapping(value="/getUser", method=RequestMethod.POST).
If you do not specify any mapping this method will resolve all the http request, i.e. you can send GET, POST, HEAD, OPTIONS, PUT, PATCH, DELETE, TRACE request to the specified url and it will be resolved.
The RequestMapping has attributes produces and consumes, e.g.
@RequestMapping(value = "getBooking", produces = {MediaType.APPLICATION_JSON_VALUE})
The produces specify the data format that will be returned to client.
produces = {MediaType.APPLICATION_JSON_VALUE} means produce a response with content-type=application/json.
Indicating that a method parameter should be bound to a web request parameter. For example,
http://localhost:8080/sbw/user/getUser?userId=2
In the above URL request, the values for userId can be accessed as below:
  public User getUser( @RequestParam(value="userId") String userId ){
   ...
  }
If you’re sending your data as classic request params, you can bind to object by simply omitting the @RequestParam, e.g.
  @RequestMapping(value = "getUser2")
	public User getUser2(User user) {

		return this.userService.getUser(user.getUserId());
	}
  function getUser2() {


	   var search = {
	      "userId" : 2
	   }

	   jQuery.ajax({
	      type: "GET",
	      url: "/sbw/user/getUser2",
	      data: search,
	      success :function(result) {
        //....
	     }
	  });
  }
@PathVariable is similar as @RequestParam except that it is used for accessing the values from the URI template.
http://localhost:8080/sbw/getUser/2?userName=fk
  @RequestMapping("/getUser/{userId}")
	public String getUser(@PathVariable(value="userId") int userId,
	@RequestParam(value="userName") String userName,
	){
     .......
  }
@RestController is @Controller + @ResponseBody, and it avoids the need of prefixing every method with @ResponseBody.
The RESTful web service controller simply returns the object and the object data is written directly to the HTTP response as JSON/XML automatically.
Spring lets you return data directly from the controller, without looking for a view, using the @ResponseBody annotation on a method.
@Requestbody & @ResponseBody annotations are used to convert the body of the HTTP request to POJO or POJO to response body.
Both these annotations will use registered HTTP message converters in the process of converting/mapping HTTP request/response body with POJO.
For example, If you’re sending json in http request and a POJO is used as controller method parameter, then you have to use @RequestBody such that the json can be converted into this POJO.
Every String will treated as a string and every other Object will get serialised/deserialised by Jackson.
This allows to serialise manually (by returning String) or automatically (by returning something else) in Spring controllers.
  @RestController
  @RequestMapping(value = "/booking/")
  public class BookingAction {

    @RequestMapping("getBooking")
    public Booking getBooking() {
        //get booking data
	return booking;
    }
  }
Spring boot default use jackson, this class is annotated with @RestController,
and this method returns booking which is a POJO, therefore, this POJO will be converted into json.
However, if it is :
   @RequestMapping("getBooking")
    public String getBooking() {
        //get booking data
	return JSONObject.fromObject(booking).toString();
    }
It returns json data as raw string not POJO, and if the client didn’t specify an Accept header, then Spring
won’t feel need to do anything with the result just return string,
that is the return value will be handled by StringHttpMessageConverter which sets the Content-type header to text/plain.
In this case, there are 2 approaches to return a JSON string:
Accept header value as application/jsonproduces to @RequestMapping(value = "getBooking", produces = {MediaType.APPLICATION_JSON_VALUE})Spring has a list of HttpMessageConverters registered in the background.
Spring loops through all registered HTTPMessageConverters seeking the first that fits the given mime type and class, and then uses it for the actual conversion.
From springbootdev:
The client (web browser or REST client) cannot send the java objects (as it is) in the body of the HTTP request. On the other hand, the server application cannot compose the body of the HTTP response with java objects (as it is).
Simply the HTTP Request and Response body cannot contains the in the form of java objects.HTTP request and response body should contain either JSON , XML or some other type of formatted data (RSS etc).
Therefore the HTTP message converters are used to convert the HTTP request body (either in JSON or XML) to the Java objects and Java objects back to XML or JSON for embedding into the HTTP response body.
The spring mvc will check the header of http request to pick a appropriate message converter:
Content-Type is application/json, then it will select a JSON to POJO converter.Accept is application/json , then it will select a POJO to JSON converter.@ModelAttribute is used to bind a method parameter or a method return value to a named model attribute.
It can be used either on methods or on method parameters.
Spring invokes all methods that have @ModelAttribute annotation before handler methods
(i.e. methods annotated with the @RequestMapping) in a same controller.
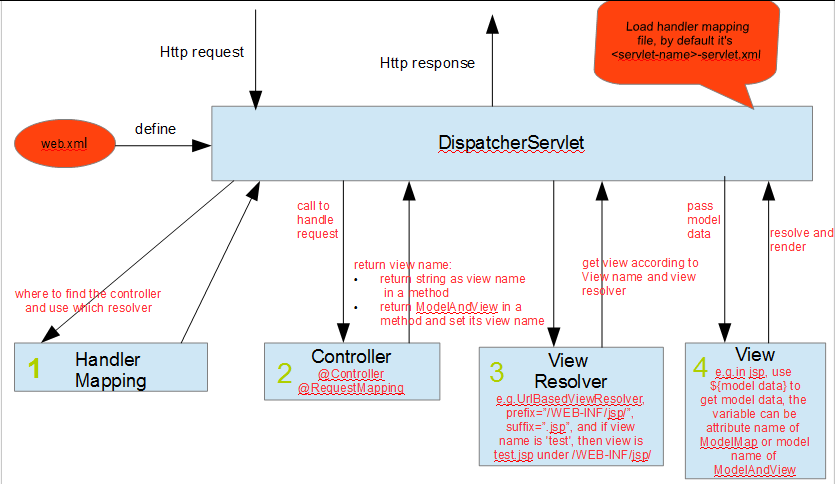
DispatcherServlet which is a servlet, while struts 2 use StrutsPrepareAndExecuteFilter which is filtermybatis : 3.3.1
jdk : 1.7
mysql : 5.6
In this example, the steps as follows :
<?xml version="1.0" encoding="UTF-8" ?>

<!-- doctype is required and has to the same as following for configuration file -->

<!DOCTYPE configuration PUBLIC "-//mybatis.org//DTD Config 3.0//EN"

"http://mybatis.org/dtd/mybatis-3-config.dtd">

<configuration>

<!-- The elements under configuration has order, e.g. if we change the order

of settings and typeAliases, then there is error tip.

-->

<settings>

<setting name="logImpl" value="SLF4J" />

</settings>

<!-- use Address to represent cn.example.mybatis.model.Address. via typeAlias-->

<typeAliases>

<typeAlias alias="Address" type="cn.example.mybatis.model.Address" />

</typeAliases>

<environments default="development">

<environment id="development">

<transactionManager type="JDBC" />

<dataSource type="POOLED">

<property name="driver" value="com.mysql.jdbc.Driver" />

<property name="url" value="jdbc:mysql://localhost:3306/test" />

<property name="username" value="root" />

<property name="password" value="" />

</dataSource>

</environment>

</environments>

<mappers>

<!-- resource for xml approach and class for annotation -->

<!-- <mapper resource="AddressMapper.xml" /> -->

<mapper class="cn.example.mybatis.annotation.AuthorMapper" />

</mappers>

</configuration>
general pojo class
public interface AddressMapper {

public void insertAddress(String zipCode);

public List<Address> getAddressByIdList();

public Address getAddress(@Param("id") int id,

@Param("zipCode") String zipCode);

public void updateAddress();

public void updateAddressById(Address a);

public void deleteAddressById(int id);

public void insertAddress(Address a);

}
with mapper configuration xml file :
<?xml version="1.0" encoding="UTF-8" ?>

<!-- doctype is required and has to the same as following for mapper file -->

<!DOCTYPE mapper PUBLIC "-//mybatis.org//DTD Mapper 3.0//EN"

"http://mybatis.org/dtd/mybatis-3-mapper.dtd">

<!-- The value of namesapce should be with package name -->

<mapper namespace="cn.example.mybatis.xml.AddressMapper">

<!-- resultType still is 'Address' even it returns a list -->

<select id="getAddressByIdList" resultType="Address">

select * from address;

</select>

<!-- multiple parameters should be use parameterType="map" -->

<select id="getAddress" parameterType="map" resultType="Address">

select * from address where id=#{id} and zipCode=#{zipCode};

</select>

<!-- parameterType is optional in this case -->

<update id="updateAddressById" parameterType="Address">

update address set zipCode=#{zipCode} where id=#{id}

</update>

<delete id="deleteAddressById">

delete from address where id=#{id}

</delete>

<!-- the 'id' of address is auto increment in DB, but developer don't need to care its value when executing insert statement, the sql just as follows. -->

<insert id="insertAddress" parameterType="Address">

insert into address(zipCode) values(#{zipCode});

</insert>

</mapper>
**Note:
select * from student where <if test="id != null ">id = #{id}</if> <if test="name != null"> and name = #{name} </if>
However if id and name are null, then this sql be select * from student where
or if id is null but name is not null, then sql is select * from student where and name = ?
bothe are wrong.
The solution is change sql to :
select * from student <where> <if test="id != null ">id = #{id}</if><if test="name != null"> and name=#{name}</if> </where>
With the help of <where>, if id and name are null, then the sql be select * from student or if id is null but name is not null, then sql is select * from student where name = ?, mybatis will strip and off from and name = #{name}<foreach collection="list" item="i">#{i.id}</foreach>, item is required, and if collection stands for list of custom POJO, then #{i.id} has to be used, if this list means Listor for annotation without mapper configuration:
public interface AuthorMapper {

@Select("select * from author where id=#{id} and name=#{name}")

public Author getAuthor(@Param("id") int id,@Param("name") String name);

@Select("select * from author")

public List<Author> getAuthors();

@Insert("insert into author(name) values(#{name})")

public void insertAuthor(Author a);

@Update("update author set name=#{name} where id=#{id}")

public void updateAuthor(Author a);

@Delete("delete from author where id=#{id}")

public void deleteAuthor(int id);

}
InputStream is = Resources.getResourceAsStream("mybatis-config.xml");

SqlSessionFactory factory = new SqlSessionFactoryBuilder().build(is);

SqlSession session = factory.openSession();

AuthorMapper mapper = session.getMapper(AuthorMapper.class);

mapper.deleteAuthor(10);

session.commit();
For instance, there are two sql xml files sql1.xml and sql2.xml
<mapper namespace="sql1">

    <select id="select1" resultType="student">
	....
    </select>
</mapper>
<mapper namespace="sql2">

    <select id="select2" resultType="student">
	....
    </select>
</mapper>
If developer want to use select1 in sql2.xml, then he/she just use qualified name of select1, that is sql1.select1
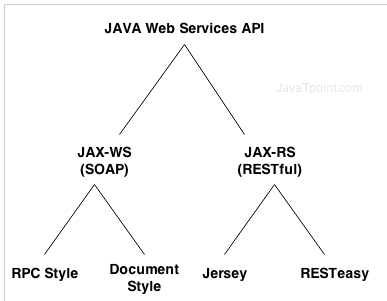
1.What is web service
It is used to communicate from one system to another system over the internet even they are build in different programming language.
2.Types of web service
soap(simple object access protocol) is xml based and the java-ws(java api for xml web service) is its API.
restful(representational state transfer) is an architectural style not a protocol and jax-rs(java api for restful web service) is its API.
The group by statement is used to group the result-set by one or more columns, e.g.
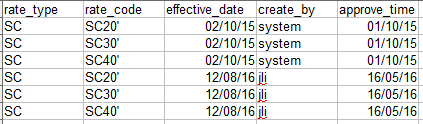
if the sql is : select rate_type, effective_date from table group by rate_type, effective_date, then the result looks like next :
SC 02/10/15
SC 12/08/16
Note : the columns in select have to be in group by or in aggregate functions, in other words, if we want to select rate_type, effective_date, approve_time in a sql with group by, then the sql should be :
‘select rate_type, effective_date, approve_time from table group by rate_type,effective_date,approve_time’
or
‘select rate_type, effective_code, max(approve_time) from table group by rate_type,effective_date’
Note : the column with varchar type also can be used in aggregate functions besides the number
and it is wrong if it is ‘select rate_type, effective_date, approve_time from table group by rate_type,effective_date’.
The having clause is used with group by usually and the aggregate functions following it.
It was added to sql because where clause could not be used with aggregate functions.
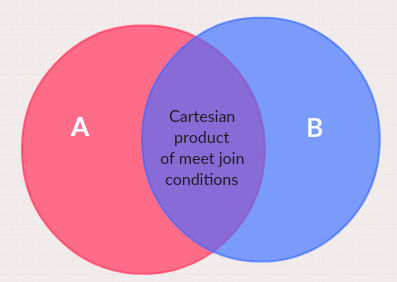
The result set of left join is : Carterisan product of meet the join conditions of table A and table B + rest of table A
The result set of inner join only is the Carterisan product of meet the join conditions of table A and table B